Noise Reduction (NR, for short, since that term’s gonna come up a lot in this post) is an oft-misunderstood topic. It’s not as easy as it sounds since proper NR involves careful manual adjustments based on the level of noise present in the image, not just dragging a slider all the way to the right (and no, that does not constitute manual labor lol).
What is Noise?
Before we get to the meat of this post, it’s important to understand what noise is and how NR works. Noise is an artifact caused by digital sensors and is present in all digital images, no matter how low an ISO is used. Noise does not exist on its own though. The ‘Signal-to-Noise ratio’ (SNR) is a good indicator of how much detail (Signal) is captured relative to the amount of noise in an image. For example, at a camera’s native ISO (say ISO 100), the SNR is very high because the level of detail captured is significantly higher than the level of noise present. As the ISO is increased, the SNR falls and the level of noise catches up with the level of detail. Why is this important? Because that’s the basic premise of NR.
How does Noise Reduction work?
NR seeks to minimize the level of noise by analyzing a detail-less sample area within an image. This allows the software to distinguish between the pattern of noise and areas of detail. At the moment, the only software that allows precise manual control over the selection of the sample, calibration, and level of noise reduction is Neat Image. Over the past few months, though, I’ve seen and received a ton of ads about a new, shiny, AI-based, Rolls-Royce-esque software on the market – Topaz Labs’ DeNoise AI.
Keep it simple. What’s DeNoise AI?
Basically, Topaz DeNoise applies NR using algorithms developed by “feeding it millions of noisy/clear images until it actually learned what noise is and how best to remove it.” (from Topaz Labs’ website).
Sounds neat (pun totally intended), but does it work?
Well I’m glad you asked! The short answer is….it’s complicated. It does work and it performs better than I expected, but I have a few reservations. For the purposes of this post, I’m only going to talk about High-ISO results; Low-ISO results are more or less the same with any generic NR software.
My NR Process
Before I show you the samples, I’ll briefly explain my NR workflow. I always apply NR selectively using layer masks. I apply a pass of very strong NR on the background, and a lighter pass on the subject. This ensures that there is minimal loss of detail on the subject while rendering the background smooth and pleasing.
Purple Sandpiper – ISO 4000

This is a very noisy image shot at ISO 4000 on my Nikon D850. As you can (probably) see, the background’s quite rough. The good thing, though, is that the noise is grainy and NR should be an easy task. The bad news? There’s a lot of noise on the out-of-focus area on the bird’s body. NR on this area will require a compromise between noise suppression and detail retention. Anyways, let’s see how the software fared.

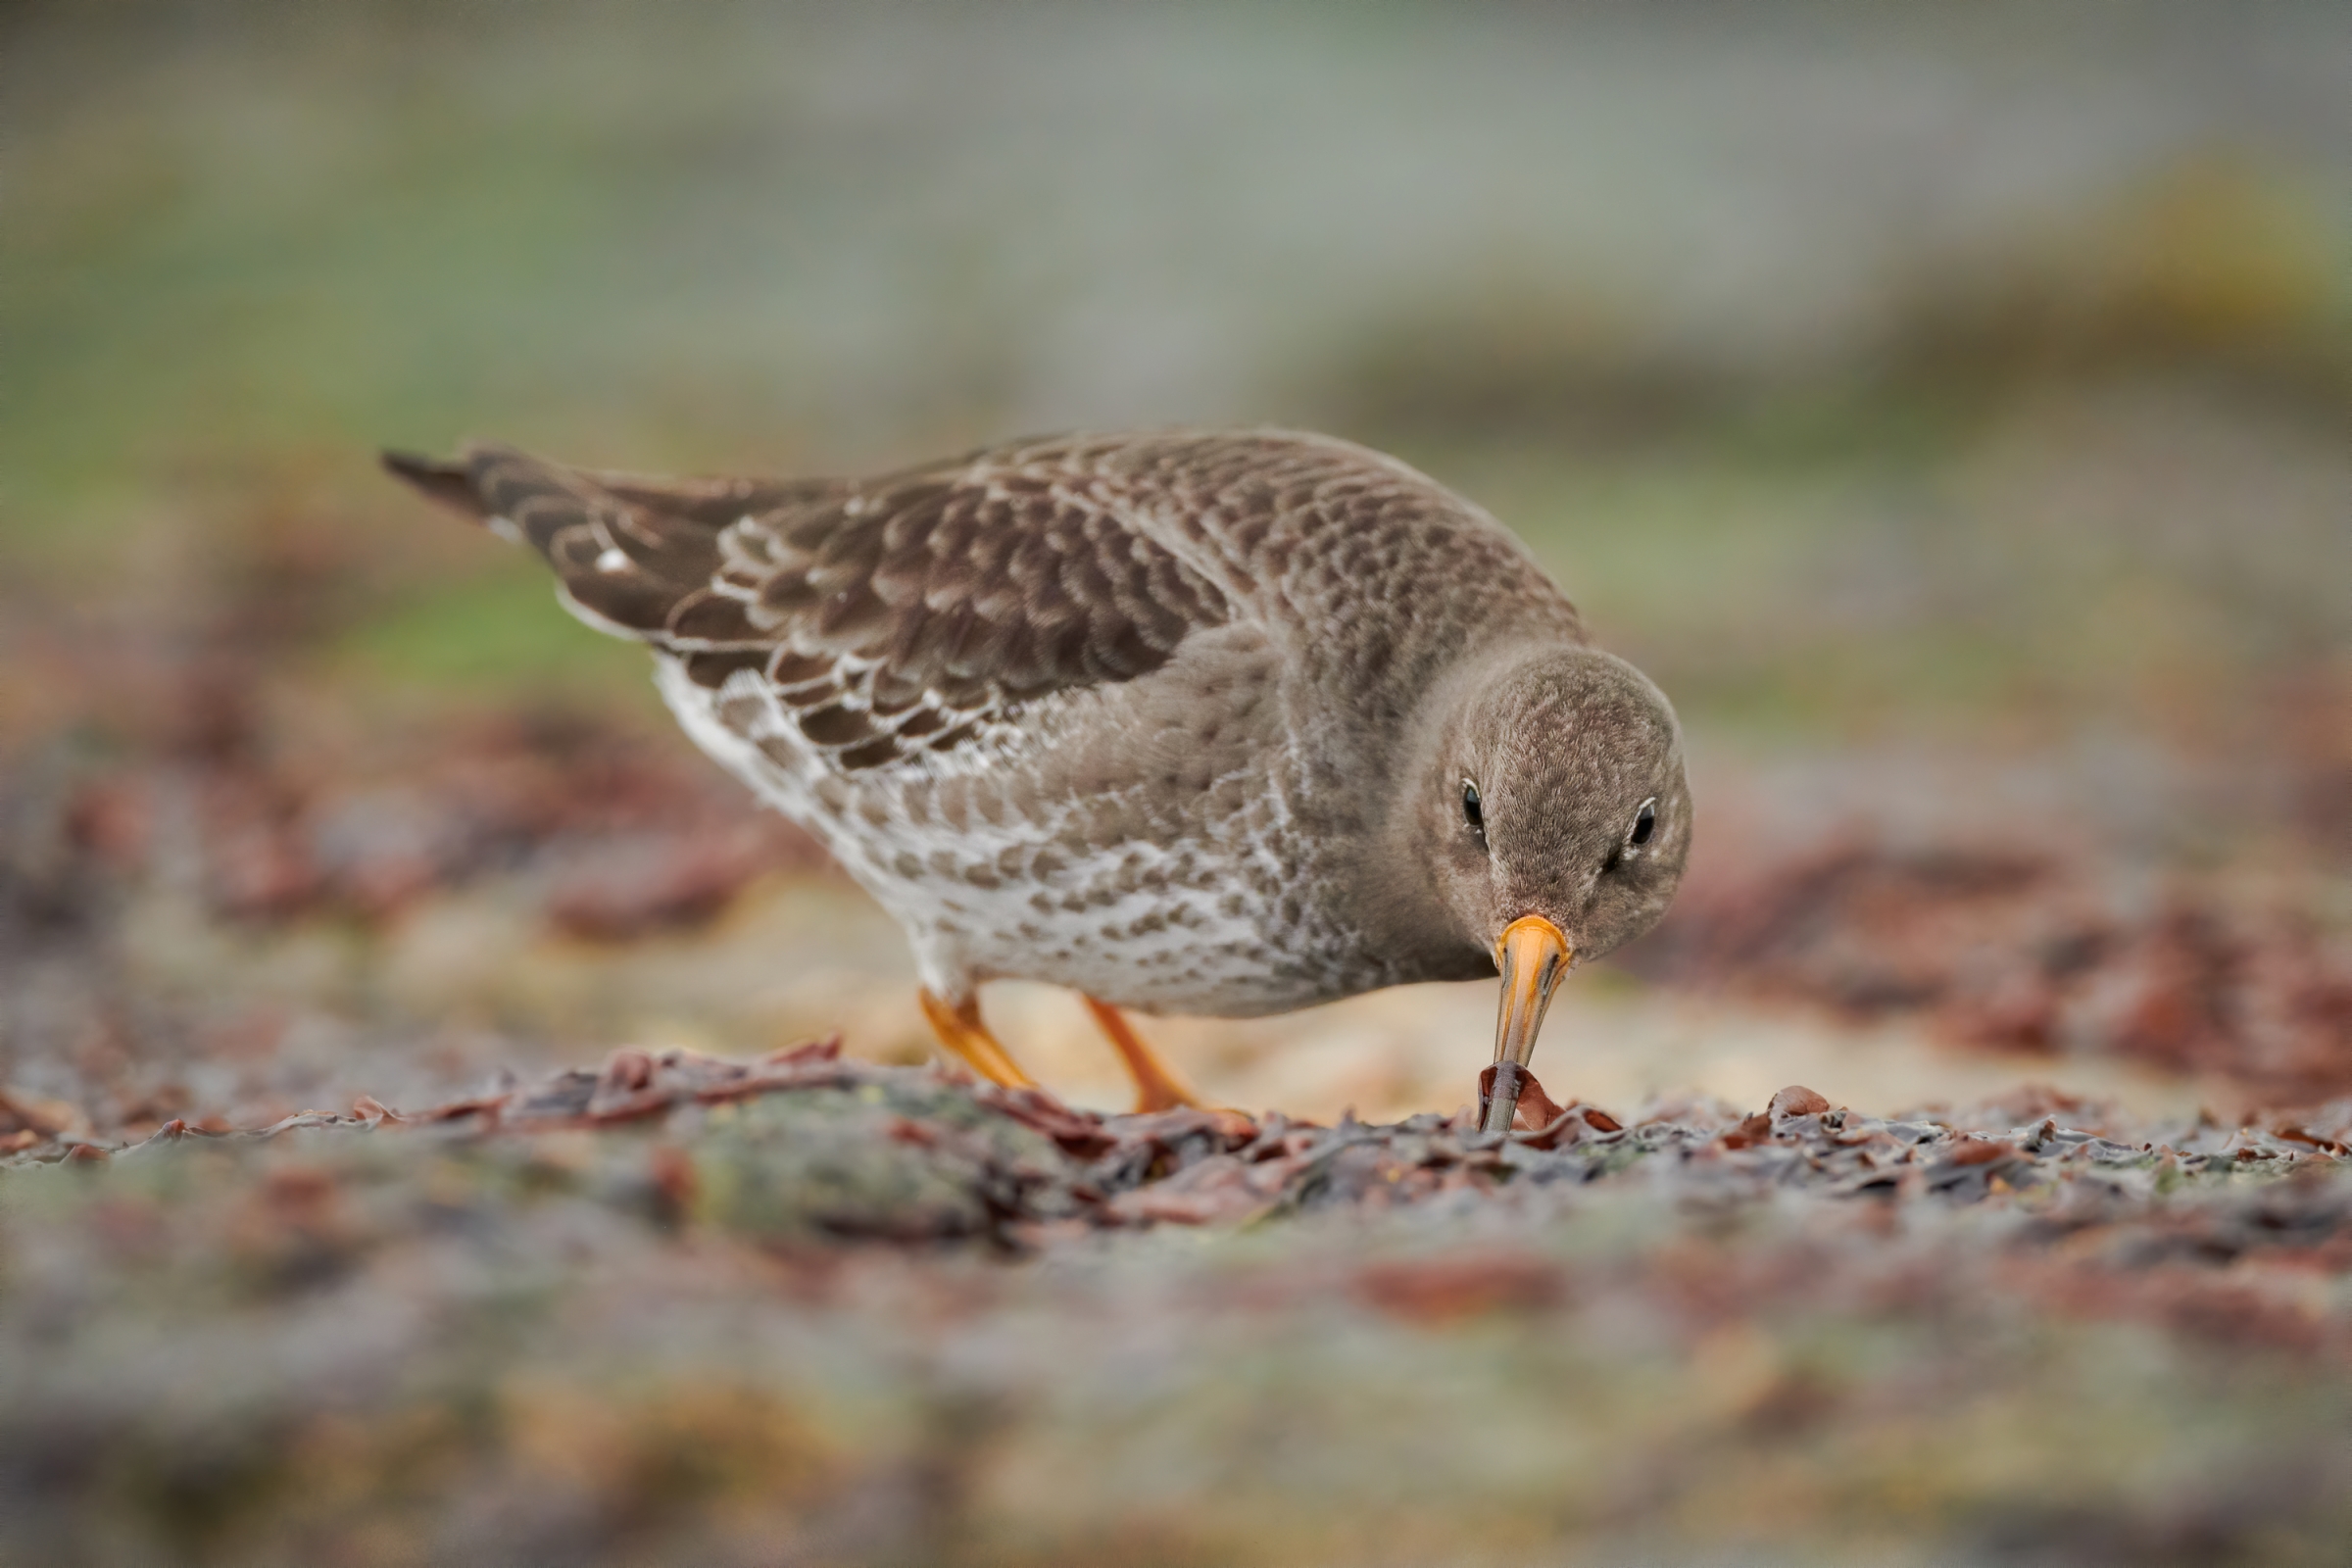
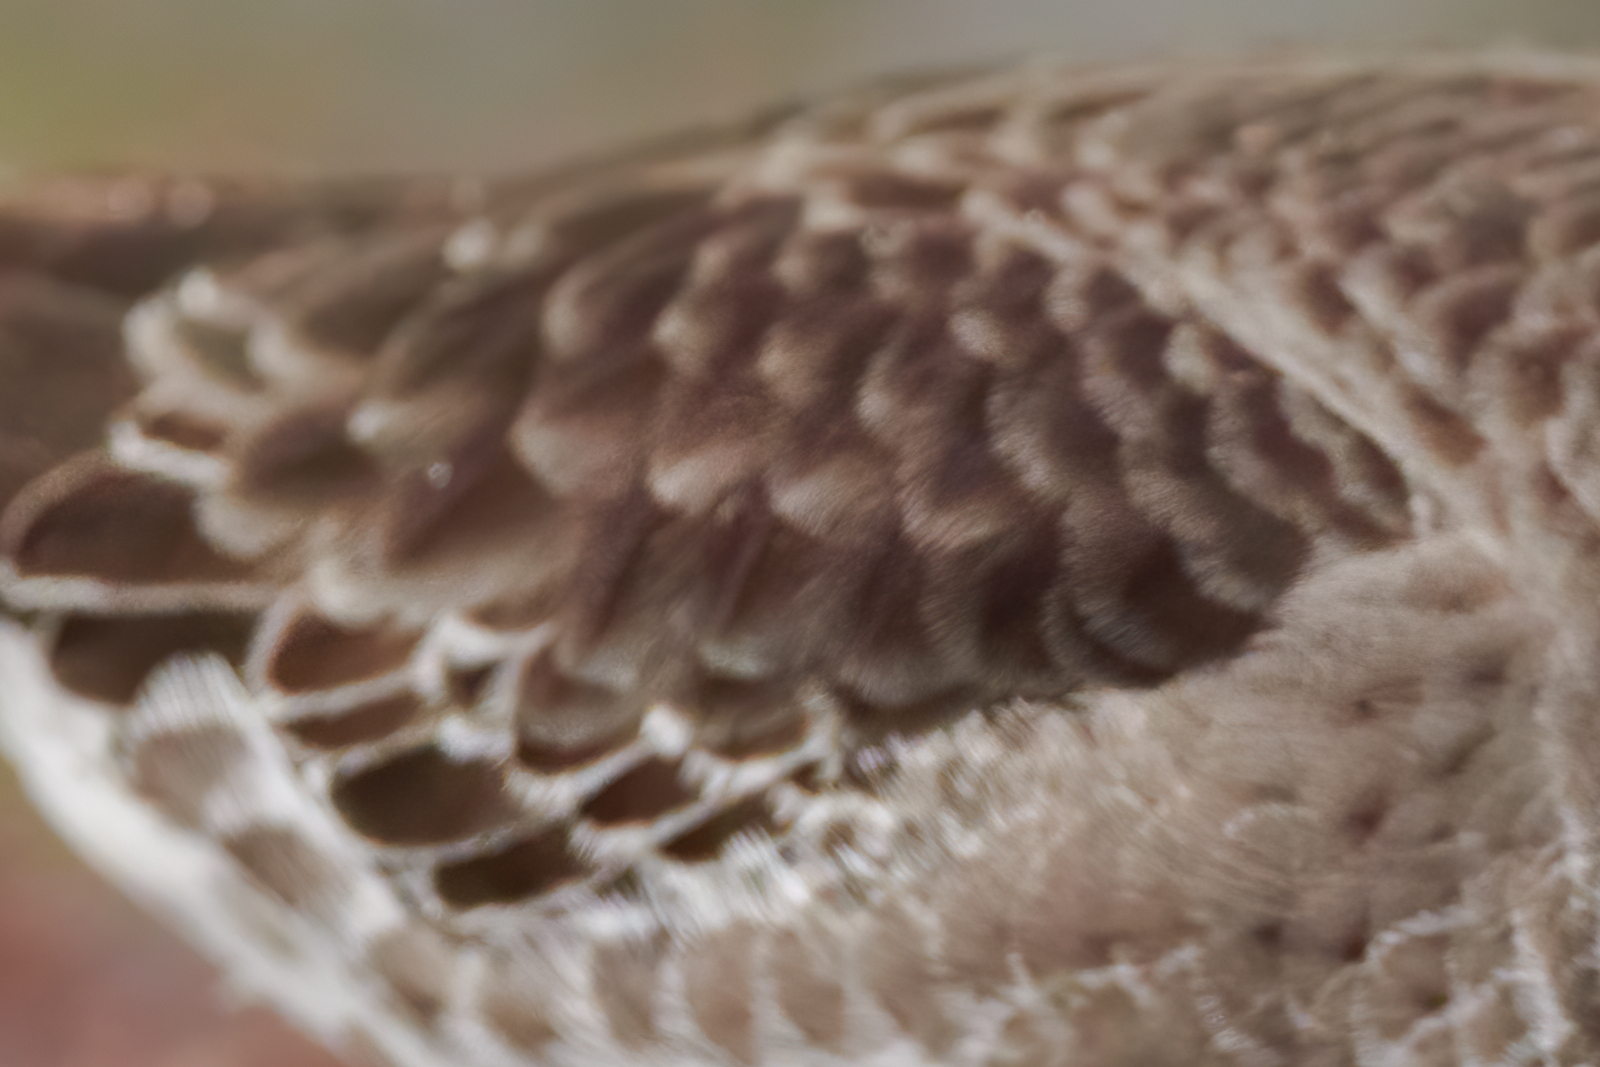
Compared to the original capture, both Neat Image and Topaz DeNoise AI have performed very well. Looking at the results critically, Neat Image has rendered the background way smoother than DeNoise AI. This is because the latter has attempted to preserve detail in the out-of-focus areas, but it has caused parts of the background to turn blotchy and ‘nervous’. The bird’s head seems a hair (hehehe…) sharper in the DeNoise AI image, but there’s a reason for the difference.
Understanding the Algorithms
From my experience, what DeNoise AI does is that it suppresses noise, but it also adds sharpening and contrast (even when the Sharpening and Preserve Details sliders are set to the lowest setting of 0). While this may seem appealing in promotions and even in real-life use, it’s actually misleading and, ultimately, reducing the quality of your files. The claim that the software, according to Topaz Labs, “recovers crisp detail” may sound true on paper, but sharpening is NOT detail recovery. It’s the addition of contrast at a pixel level that gives the illusion of a higher level of detail, when it’s actually destructive. Sharpening is supposed to be the final step in processing an image, and should never be applied to the master image during NR.
In contrast, Neat Image has rendered the file a lot smoother. There are no hints of nervousness in the out-of-focus regions. The bird’s head is rendered slightly softer, but that’s because Neat Image does not apply sharpening or contrast during the NR process; the fine feather detail’s still present. The main downside is that the learning curve for the software is steep and takes some experimentation and getting used to.
A pattern I noticed throughout my tests was that practically every image that DeNoise AI was applied on had a few areas that were either completely smudged due to excessive NR or had too much noise due to no/low NR. My theory is that DeNoise AI sometimes fails to separate areas of detail and noise in the image. The problem with this is that there is no opportunity to manually reduce/apply NR in those areas; it can only be done by the software.
Peregrine Falcon – ISO 4000
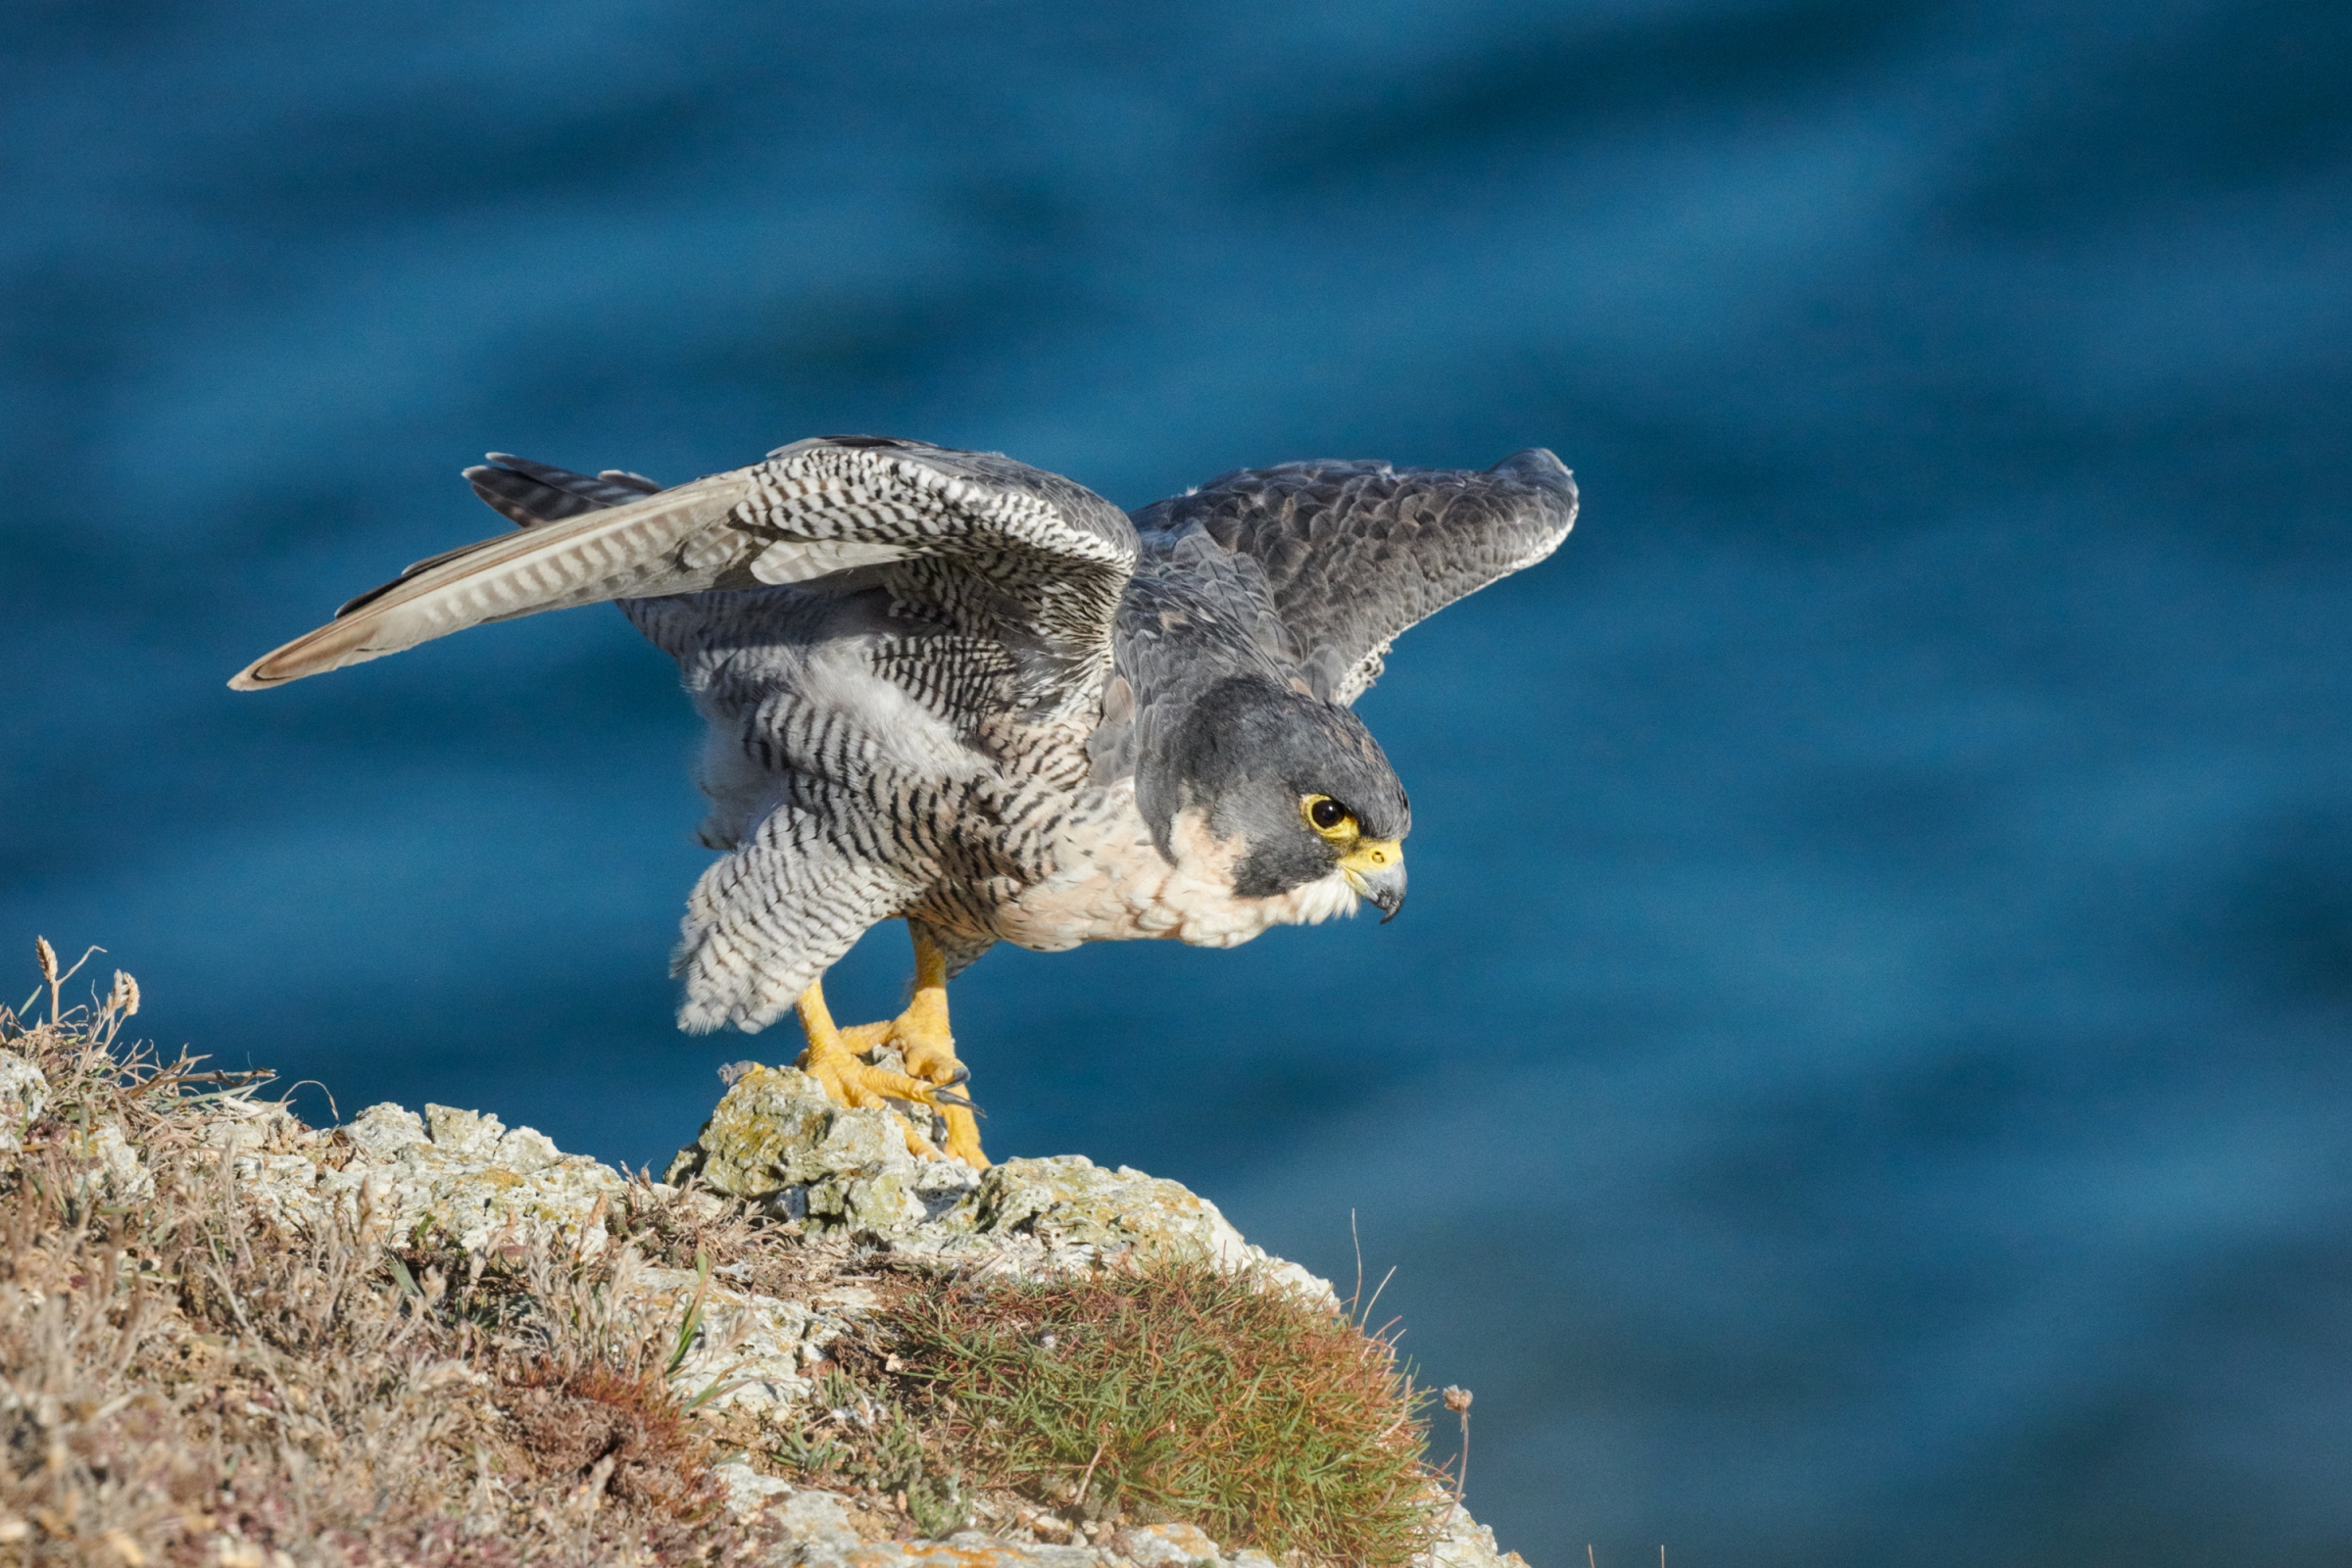
Here’s another ISO 4000 example of a Peregrine Falcon. Again, the background and the subject are very noisy, but the problem here is that the subject is also full of detail, and isolating the noise from the detail is a massive ask for either software. Let’s see the results from this test.


Again, the results are similar, with Neat Image having a slightly grainier background, but a more even NR on the subject. Topaz DeNoise, even at very low NR settings, is quite heavy-handed. However, I’m (mostly) impressed with it’s ability to separate detail from noise. Layer Masking with Neat Image was quite a painful experience in this case even though, in my opinion, it gave the better end result. Topaz DeNoise was comparatively much quicker which may be appealing to most people.
I applied the same level of output sharpening for both the Neat Image as well as the DeNoise AI results. Since DeNoise AI already applies a layer of sharpening in its NR process, the final image looks sharper when down-sized for web use, but halo artifacts can be found in the master TIFF file. Also, when you look at certain parts of the image, such as the underwing shadows, you can see that DeNoise has applied very strong NR, which has eliminated detail. The ‘Blacks’ are also deeper due to the added contrast mentioned earlier.
TL;DR
Topaz DeNoise AI
Pros:
- Fast NR
- Can be used without layer masks with a good degree of accuracy
- Good accuracy, although it can sometimes cause artifacts
CONS:
- Less accurate NR than Neat Image; irregular NR in parts of an image with no ability to manually override AI
- No manual control over sample area or other noise level parameters
- Heavy-handed NR even at low settings
- Applies sharpening and contrast – reduces quality but gives the illusion of a sharper file
- Preserves detail in the background (even when ‘Preserve Details’ is set to 0) – causes blotchy backgrounds. Artifact suppression isn’t provided.
Neat Image V8
Pros:
- Very accurate NR and gives precise manual control over sample area, noise level and NR parameters
- Fast processing
- Does not usually cause artifacts – offers artifact suppression tools to reduce them if they occur
CONS:
- Very steep learning curve; difficult for beginners
- Best used with Layer Masks – can be time-consuming and strenuous
Conclusion
When I first heard of Topaz DeNoise AI, I was quick to dismiss it as just another gimmick. After using though, my opinion has changed somewhat. I still maintain that it’s not the ideal NR solution – Neat Image is still the king of NR software – but it’s certainly a big step forward compared to the other products on the market, and even LR and C1Pro’s own inbuilt NR sliders.
My main gripe with the product, though, isn’t the quality of the NR – it’s more than decent – but with the algorithms themselves. I don’t get why Topaz would want to implement sharpening and contrast within the NR algorithms for any reason other than to give an illusion to the user of, as they put it, “a pixel-perfect photo in any situation.” That’s simply not true. Sharpening anything but the down-sized/up-sized file AFTER NR is not ideal. The sharpening/detail sliders seem redundant to me considering they’re applied to the image regardless of the setting you choose. DeNoise AI is a genuinely good NR software (even if it has its quirks), but it’s been over-cooked, in my opinion, by some of the decisions at Topaz Labs – it’s not “groundbreaking technology”, it’s not going to make your images “noise-free”, but it gets the job done relatively easily. As with most things in photography, a ‘one-click solution’ is never going to give you the best results. However, for the photographer who needs to process images relatively quickly and isn’t too concerned about critical image quality, DeNoise AI might be a good fit.
Disclaimer
I’m not sponsored by either Neat Image or Topaz DeNoise. I used the 30-day free trial of DeNoise AI that’s available on Topaz Labs’ website, and the Pro version of Neat Image V8 that I purchased for my personal use.
Link to the 30-day free trial of Topaz DeNoise AI: https://topazlabs.com/denoise-ai/
Comments 10
Nice post Aditya, and I agree with your conclusions and pros vs cons. In your sandpiper image I still see noise on the beak area especially on the Topaz image that isn’t present with the NI frame, likely related to some of the additional sharpening. The Topaz falcon image does have a lot of artifacts when you look closely as well — I guess you could brush them out, but then that isn’t much of a time saving compared to layers. I try these products every now and then and often make more work for myself trying to clean up various aspects than if I hadn’t tried, but every now and then I am very impressed by them too.
Author
Thanks a lot for visiting, Alex! I was curious to see how far AI has come in terms of reducing the need for manual input in post-processing. It certainly is a pain to have to draw layer masks when editing multiple photos and is quite time-consuming. I think DeNoise AI has potential and will improve over time. Hopefully, they’ll sort out the artifact and sharpening issues soon, but it’s a promising start. I, too, am impressed by the quality of the output that these products deliver from time to time. The future’s looking bright, that’s for sure 🙂
Thanks for the comparison. I’ve been using Neat Image for years and wondered if I was missing out with Topaz. I’ll be in no hurry to change.
Author
Thank you so much for visiting and commenting, Dick! I’m glad you found this post helpful! 🙂
Thanks for putting together this direct comparison! I picked up Neat Video for video needs, but was curious about AI for stills, and improving speed of workflow. Won’t be deciding for a while, but I was also concerned about the confusion of sharpening settings within their DN tool (Their site and product offerings in general are just a bunch of overlap and confusion really). Hope AI does improve and offer a streamlined approach when needed though.
Thank you for the analysis. I would have used the Topaz software, it having been endorsed by a professional photographer I respect, but it does not run on Linux, and that’s a non-starter for me. Like you, I have been happy with NeatImage 8 Pro. As you say, a bit of a learning curve, but lots of fine control, and you can use the generic or self-calibrated profiles if you don’t want to custom work each image.
That said, Topaz’s separate sharpen module that claims to reconstruct artifacts instead of just edge sharpening does look impressive.
Many thanks Aditya. I have an (older) NI v6 pro licence and was thinking if it was worth moving to Topaz denoise AI etc. I’m going to become more involved with deep sky object imaging, so most of my processing of the data will be with PixInsight, with some minor work in Photoshop CS6. Possibly some noise reduction with NI (standalone or plugin), although PixInsight has some great noise removal tools such as multiscalelineartransform and tgvdenoise (it’s a very complicated application, makes Photoshop look easy lol!).
I think I will upgrade to v8 pro (stand alone and CS6 plugin). I don’t know how large the improvements are from v6 to v8. I haven’t used NI in probably 10 or so years, as I’m doing less terrestrial photography (actually, macro photography and a bit of birding photography, although my latter is nowhere near as remotely good as yours!).
Thanks for your thoughts.
Cheers,
Dave
Author
Thanks so much for reading and for the kind comment David!
NI v8 is certainly pretty good at reducing noise, but the learning curve can be slightly steep. DeNoise AI, on the other hand, is much easier and also quicker. The main issue with DeNoise AI is the lack of user control over the noise reduction process, though. Considering your interest in photographing deep sky objects, I presume your primary consideration would be whether you require full manual control over the process vs. a simple, non-complex software that provides you with just a few basic NR sliders.
I would also consider testing out the trial version of DxO PureRAW. I played around with it recently and it does seem pretty promising. It’s quite similar to DeNoise AI (with even fewer control over the whole NR process!) but appears to have a more robust algorithm.
Thanks again for the comment and apologies for the late reply! I hope this was helpful. If you have any more questions, feel free to leave a comment and I’ll try to get back to you ASAP 🙂
Thank you for the informative article and the provision of the photos.
You have a great camera which produces such low noise at this ISO.
I took the liberty of comparing this photo with GIMP-ML and GMIC, which I think also produce good results at low ISO noise. And without artifacts.
Please see https://ibb.co/ZTC27Hm
I thought the Topaz (free demo) over did it. The software limited me from making adjustments like you pointed out. I’ve been using Neat Image V8 and it does a good job with overdoing it. Thanks for doing the comparison. I’m validated to stick with Neat Image. Sometimes if Neat Images does not remove all the specs (if that is what you call them, similar look to a dead pixel), the blur tool in Photoshop solves the problem. Again, thanks for this post. Tommy